

Orekit is free software, which means you can use the source code as you wish, without charges, in your applications, and that you can improve it and have your improvements included in the next mainstream release.
Considering contributing? Great! A warm thank you to you! We are always happy to have new contributors join our community and help us improve Orekit. This document is intended to help you take your first steps in the project.
You can contribute in many ways:
Participate in the discussions on the forum
You can participate in discussions on the forum, share your experience with Orekit or in space flight dynamics, provide help to less experienced users, or simply explain the features you miss in Orekit.
We want everyone to have a good experience from their interactions with the Orekit community. Please be welcoming, cordial and caring. Avoid insulting or derogatory language, or other conduct which could reasonably be considered inappropriate in a professional setting.
Report bugs or feature requests
You can report bugs in our bug tracking system. If you have trouble qualifying the problem, talk about it on the forum first. And remember: the more information the community get, the easier the community can reproduce and fix it.
The bug tracking system is also the right place to report your feature requests. We do not promise to take them into account, and even less to do it quickly, because we have limited human resources and our own priorities. But by expressing your needs in the tracking system, you leave a record of them and a contributor will be able to implement the feature when he or she will be available.
Improve the documentation
You can help us improving the existing documentation or you can write a new tutorial, to help users to better understand the use of some features.
Except for the tutorials, all the documentation is embedded with the source code. You can find it in the src/site directory of the Orekit source code repository. This documentation uses the Markdown lightweight text format. It is integrated with the source code to ensure its consistency with the source code version. Therefore, to contribute to the documentation, you should proceed as if you were contributing to the source code (see next point), but without having to write tests. ;)
If you want to enhance a tutorial or write a new one, please note that these are managed in a dedicated project named Orekit tutorials, available on our Gitlab forge. We invite you to read the specific contributing guide for these tutorials.
Improve or extend the source code
You can provide us with a patch fixing a bug, improving an existing function or implementing a new one.
If your contribution is minor and does neither affect the API nor the architecture of Orekit, get started right away, following the recommendations below in this guide. In all other cases, start by presenting the contribution you plan to make on the forum. The core team will be able to analyze your proposal and confirm that it is compatible with the objective and scope of the project, as well as with in progress and planned developments. It will also prevent you from starting work that others are already doing. This dialogue contributes to the smooth running of the project. Even the core team members go through this exercise before launching into a major contribution.
As Orekit is used for operational purposes, we want its source code to be efficient, reliable, robust and easy to maintain. The code quality is even a priority for us. We therefore strongly encourage you to read our development guidelines.
We use a set of tools (CheckStyle, SpotBugs, SonarQube…) that check compliance with our coding rules and perform static analysis of the source code. This verification is carried out by the continuous integration process. The code quality report is established by SonarQube. Since using CheckStyle in Eclipse and configuring SonarQube to take your project into account is not trivial, you will find detailed instructions about them in this guide. We know that these “details” may seem boring, but the quality of the source code determines the difficulty the community will have in maintaining it. Therefore code quality is checked before accepting contributions.
Are you ready to go? Great!
Here's how to make your first contribution:
Connect to the Orekit forge. By default, to limit spam, you can only authenticate using your account on any of the Github, Gitlab.com or BitBucket platforms. If this bothers you, please let us know and we will create a local account for you.
Create your own copy of the repository (i.e. “Fork the repository”) on our forge by clicking on the “Fork” button at the top right of the Orekit repository. This is the red rectangle on the following image:

Clone your repository on your workstation and checkout the develop branch.
Within your checked out repository, configure your username and email address so your contributions can be properly submitted:
git config user.name "First Last"
git config user.email "address@domain.tld"
Create a new branch on your fork.
The branch must have a name related to the future contribution.
For instance, if you want to correct an issue, the name must be issue-XXX where XXX represents the issue number.
If you are contributing a new feature or are correcting a bug that will need an API change, have the develop branch as the source branch.
Your contribution will be eligible for a minor version or major version (if API is changed).
Important note:
If you are correcting a bug with no API change needed, have the latest release-X.Y branch as the source branch.
Your contribution will be eligible for a patch version.
Patch versions are released more often and it really simplifies the work of the release manager if you start from the latest release branch.
Be sure to activate checkstyle (use the checkstyle.xml file at the root of the project) to help you follow the coding rules of Orekit (see examples below).
Perform your development and validation.
Update the changes.xml file in src/changes/ directory (see former
entries to help you).
Note: do this only if your work is planned for a minor/major version.
If your contribution can be added to a patch version, then the release manager will update the changes.xml file.
This file is a big source of merge conflicts so it's much easier to handle it in a go when doing the release.
See point 5 for the differences between minor/major versions and patch versions.
Run all Orekit tests to ensure everything works.
Commit your code on your branch and push it to Gitlab (you can make several local commits and push them at once).
Submit a merge request (a “MR” in the Gitlab jargon) on the forge, by clicking on the New merge request button:

Gitlab will ask you for the source repository and branch (select your fork and working branch) and the target repository and branch (select Orekit official repository an the develop branch). Be sure that the target of your request is the develop branch of the official repository.
Gitlab notifies the core team members of your merge request. One of them will review it as soon as he or she can. If your contribution seems to meet the project's expectations, he or she will accept it. If not, he or she will explain to you how it could be improved. You can then enhance your contribution and push new commits, which will be automatically added to the current merge request.
If you have any question during your contribution you can also visit the forum and ask them. The larger the community is, the better Orekit will be. The main rule is that everything intended to be included in Orekit core must be distributed under the Apache License Version 2.0.
Checkstyle is a development tool to help programmers write Java code that is compliant with a coding standard. It automates the process of checking Java code to spare humans of this boring (but important) task. This makes it ideal for projects that want to enforce a coding standard.
Checkstyle violations can be quickly verified in a Linux terminal by using
Maven commands. Contributors can execute the following command in the same
folder as the pom.xml file:
mvn checkstyle:check findbugs:check test
Note that this command is also used to check that no Spotbugs warning were
created (findbugs:check) and that the tests are running correctly (test).
Configuring checkstyle can be a difficult task when installing Orekit in an Integrated Development Environment (IDE). However, it is an important step for contributing to the library. Here are the steps you will need to follow to configure checkstyle in Eclipse.
In your Eclipse IDE, select Help -> Install New Software…
Pressing the Add… button at the top right of the install wizard will display a small popup asking for the name and location of a new software site.
Press Add to close the popup.
Select Checkstyle in the Install window and click on Next >. Proceed to the end of the wizard, accepting the licenses of the plugin and installing it.
To create the local configuration, select Properties by right-clicking in the context menu of the project explorer panel.
In the Properties popup, select Checkstyle entry.
In this second popup (i.e. Local Check Configurations) define a project relative configuration as presented in the figure below. Browse the workspace to select your checkstyle.xml file, and tick the Protect Checkstyle configuration file check box to prevent the plugin from altering the configuration.
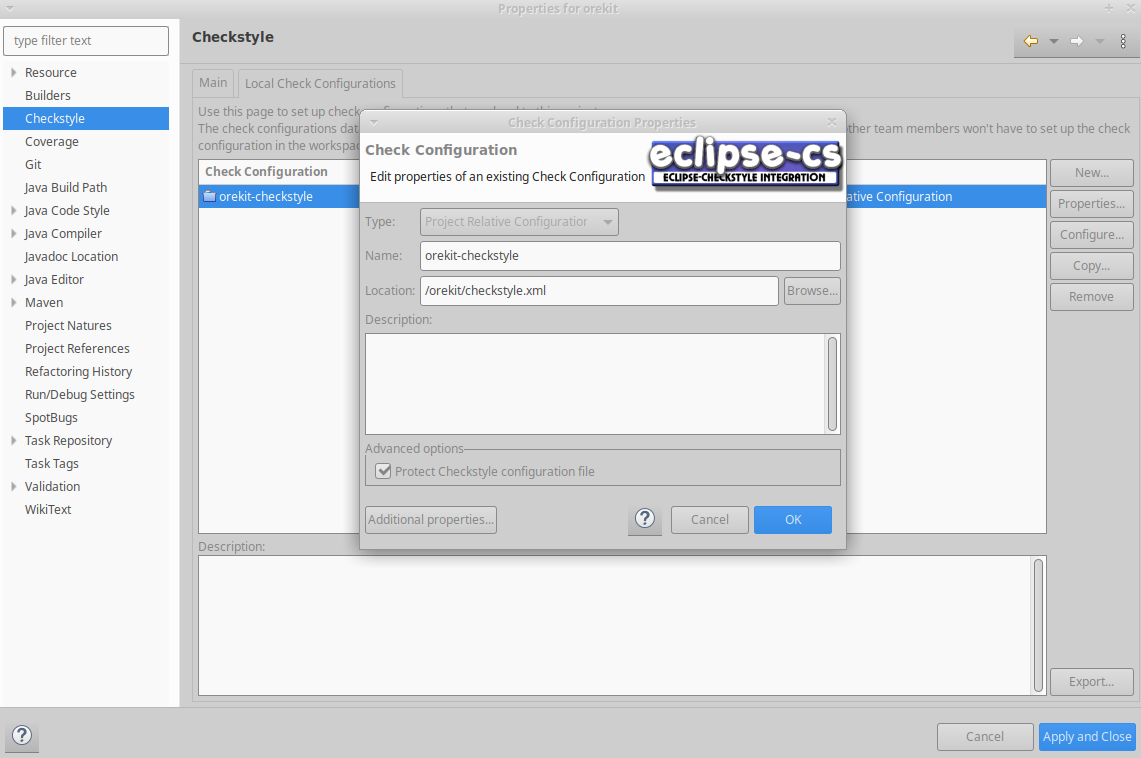 .
.
The property must be defined by pressing the Additional properties… button, which will trigger yet another popup into which the property can be configured as shown below.
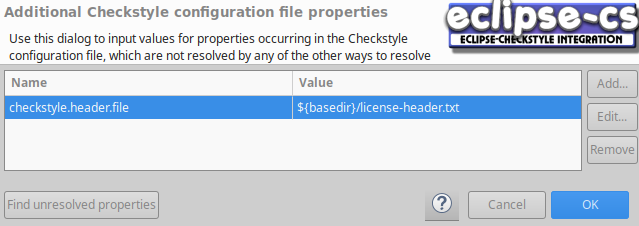
Pressing the OK button in the last open popup ends the local check configuration creation. Select the Main tab in the first popup, which should still be opened.
In the Main tab, un-tick the Use simple configuration checkbox at the top right. A few buttons should appear, allowing to remove the default Sun checks global configuration (selecting it and pressing the Remove button) and add our local configuration instead (pressing the Add… button). Using for example src/main/java/.*.java will apply checkstyle only to the files in the src/main/java directory and not to the files in the src/test/java directory.
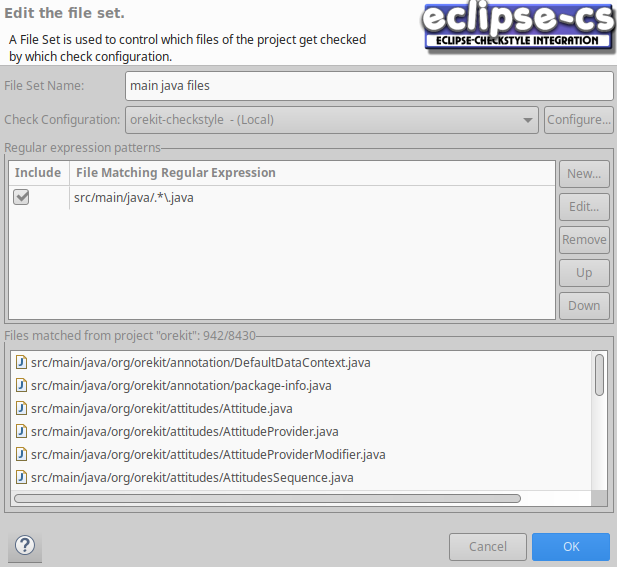
Press OK and Apply and Close to finish the installation.
Select Checkstyle -> Activate Checkstyle by right-clicking in the context menu of the project explorer panel.
As in Eclipse IDE, configuring checkstyle in Intellij IDE can be difficult. Here are the steps you will need to follow to configure checkstyle in Intellij IDE.
In your Intellij IDE, select File -> Settings -> Plugins -> Marketplace
Once installed, restart IDE
Select File -> Settings -> Tools -> Checkstyle
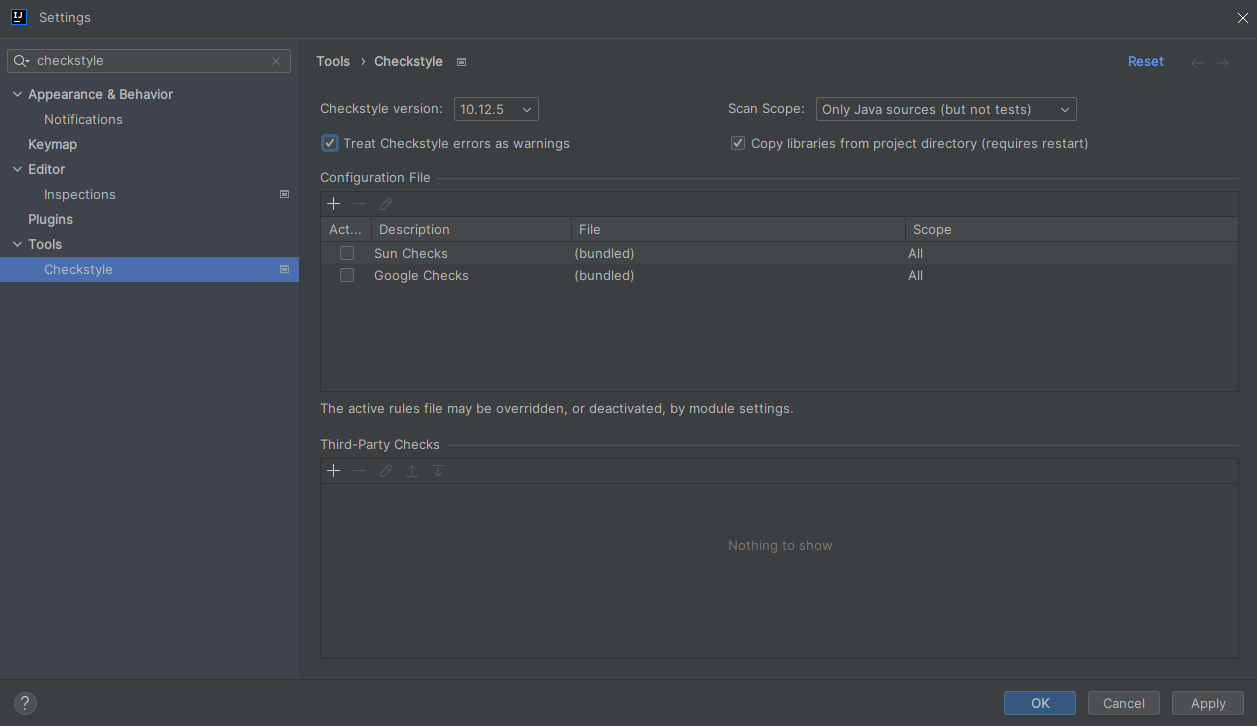
Press the “+” icon to add a new configuration. A new window will popup. Fill it in as shown below by using your own location for Orekit's checkstyle.xml file.
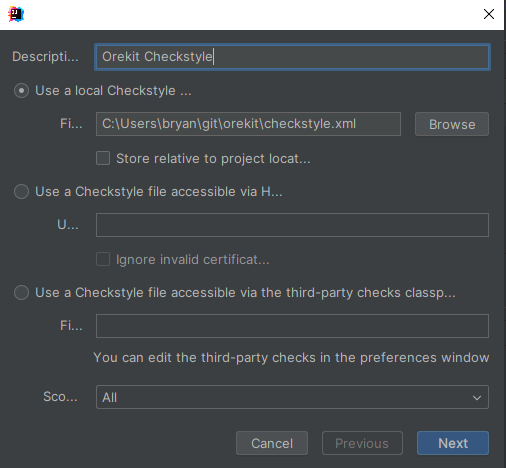
Press Next. A new window will popup to configure the checkstyle.header.file. The value is equal to license-header.txt as presented below.
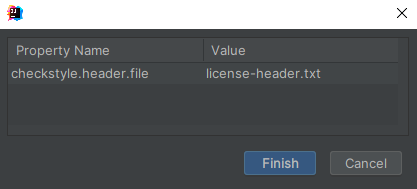
Press Finish.
The checkstyle configuration is almost finished. In the main configuration tab, the last step to perform are:
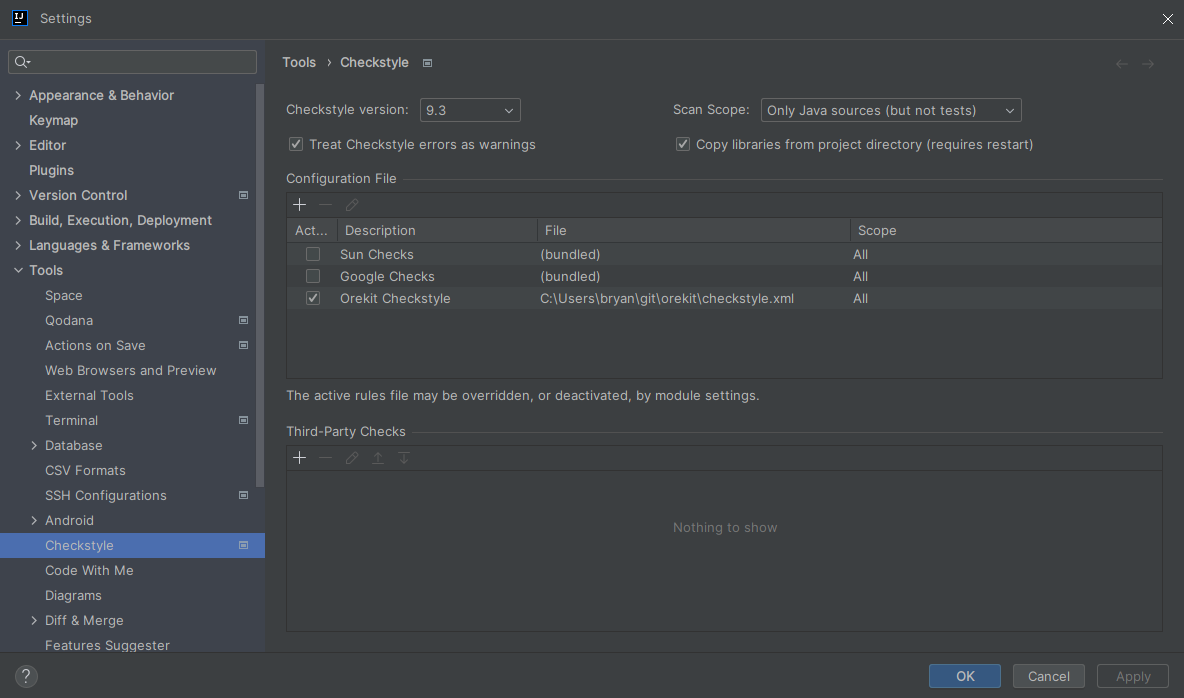
Press Apply and OK to finish the installation. The checkstyle is automatically activated.
In order for SonarQube to check the quality of your source code, you must initialize the project in SonarQube. Here is how to do it.
Connect to our SonarQube instance using your Gitlab account.
The first time you log in, SonarQube will prompt you to generate a token. Generate it and keep it safe on your workstation. If you did not do so the first time you logged in, you can do so later by going to your account settings on SonarQube: My account -> Security -> Generate Tokens.
Then connect to Gitlab.
Go to the continuous integration (CI) configuration page of your fork
(Settings -> CI/CD -> Variables -> Expand) and declare a variable
named SONAR_TOKEN. The value of this variable must be the value of the
token provided by SonarQube. Check the Mask variable option and click on
Add variable.
SonarQube dynamically initiates the project on the first submission, but this first submission must be on the master branch. You can cause this by manually triggering a pipeline. Starting with Orekit version 11, you just need to go to the pipelines page (Project homepage -> CI/CD -> Pipelines), then click on Run pipeline, then select the master branch, then click on the Run pipeline button. Then wait for half an hour, which is approximately the time needed to compile and run the tests.
After that, you can run again the pipeline on your working branch.
If your working branch is from an Orekit version prior to 11.0, step 5 described above will not work because of the continuous integration scripts did not manage forks properly. In this case, you will need to initiate the project in SonarQube from your workstation, by executing the following commands:
$ cd orekit-repository
$ git switch master

$ export JAVA_HOME=/usr/lib/jvm/java-11-openjdk-amd64

$ mvn -s .CI/maven-settings.xml --batch-mode --errors --fail-at-end \
      --show-version -DinstallAtEnd=true -DdeployAtEnd=true verify site

$ export SONAR_TOKEN=<your-sonarqube-token>
$ export CI_PROJECT_TITLE=Orekit
$ export CI_PROJECT_NAMESPACE=<your-namespace>
$ export CI_PROJECT_NAME=orekit
$ export SONAR_PROJECT_KEY="${CI_PROJECT_NAMESPACE}:${CI_PROJECT_NAME}"
$ export SONAR_PROJECT_NAME="${CI_PROJECT_TITLE} (${CI_PROJECT_NAMESPACE}:${CI_PROJECT_NAME})"

$ mvn -s .CI/maven-settings.xml --batch-mode --errors --fail-at-end \
      --show-version -DinstallAtEnd=true -DdeployAtEnd=true sonar:sonar \
      -Dsonar.login=$SONAR_TOKEN -Dsonar.projectKey="$SONAR_PROJECT_KEY" \
      -Dsonar.projectName="$SONAR_PROJECT_NAME"